


How To Fit A Bifolding Door – A Step by Step Guide

Share this story!
Share this post to any popular social media, email it to a friend or print it off.
Index
- Introduction
- How Long Does It Take?
- Parts & Ancillaries
- Equipment Needed
- Pre-Installation Checks
- Kit Form Assembly
- Installing The Sill
- Installing the Frame
- Hanging the Door Sashes
- Glazing the Door Sashes
- Final Checks & Adjustments
- Fitting Door Magnets
- Basic Operation with Traffic Door
- Basic Operation without Traffic Door
Introduction
Bifolding doors are becoming more and more popular because of how they open up the indoors to the outdoors with their wide, unrestricted openings and slick smooth action. Aluminium bifolding doors are a genuine long-life product due to the robust profile, which has been designed to give strength and durability to ensure a structurally reliable performance over a lifetime of use. Before you start to fit your bifolding doors, you need to ensure you have the right planning permission to do so. Usually, the installation of bifolding doors would fall under permitted development, but it is best to double check.

If you’re looking to keep the cost down by fitting the bifolding door yourself, we’ve put together a step-by-step guide which may help you along the way. They may seem more complex to fit than, say, a patio door, but it is possible with enough time and patience. Bifolding doors are heavy, and you will need a helping hand to carry out the fitting. If you have no experience in window and door installation, you make want to ask a professional installer for help and advice. Before you start, it’s important to understand that bifolding doors rely on carefully balanced and sliding elements and most problems come down to poor installation. Quickslide will always recommend using a fully trained and FENSA registered installer to carry out the installation.

How Long Does It Take?
Typically, fitting a bifold door will take around half a day to a full day depending on the number of panels the door has. Installing a bifolding door into a new build property may take less time compared to a refurbishment project because no old silicone will need to be scraped off in order to create a clean, square and straight aperture.
Parts & Ancillaries
Parts box for all doors
- External hinge plates (black) – 1 x per hinge (excluding wheels and guides)
- Keys – At least 3 x keys supplied
- First fix screws – 2 x per hinge (including wheels and guide)
- Final fixing screws (25mm) – 8 x per glass unit
- Toe and Heel glazing packers – 1 x traffic door (supplied with own instructions and fixings)
- Magnetic panel catch – 1 x traffic door
- Lifting block and screw (traffic door only) – 1 x per box
- Toe and Heel diagram – 1 x per box
- Sill and caps (if applicable) – 1 x pair per sill
- 1 x 3mm Allen Key required (not supplied)
FOR ALL SYSTEMS USE APPROPRIATE SCREW OR OTHER EQUIVALENT ANCHORAGE DEVICES DEPENDING ON THE HEADER MATERIAL AND CONSTRUCTION. ANCHORAGE DEVICES SHOULD PENETRATE OR HOLD SUFFICIENTLY TO THE HEADER TO WITHSTAND NECESSARY STRUCTURAL LOADING.
Additional parts for doors supplied in kit form
- If your bi-folding doors have been supplied in kit form, you will receive a parts box which include the following:
- 4 x silver tensions blocks per corner (total of 16 per panel)
- 1 x 2.5mm Allen Key
- 2 x final fixing screw per hinge
- 8 x packers per panels
- 4 x 50mm screws if you’ve opted for a low threshold
- Lifting block(s) if specified
- 1 x 3mm Allen Key required (not supplied)
Equipment Needed
- A suitable drill for securing the fixings through the frame and into the wall and a 6mm drill bit.
- Good quality frame fixings.
- Good quality silicone to seal the perimeter edges and frames to the sill, we recommend a low modulous neutral cure silicone.
- A six foot spirit level for ensuring the doors are fitted square, plumb and level. For large bifolds we recommend the use of a laser level to ensure that the doors are installed square, plumb and level.
- An eight metre tape measure.
- A selection of plastic packers that are used for squaring the frame in the opening.
- Glazing shovel.
- Flat putty knife.
- Check off the parts list to ensure that you have everything.
Pre-Installation Checks
On site assembly
*Single (1) Doors will be fully assembled with the panel/sash fitted into the frame.
Doors (any number of panels) less than 4000mm in width will be supplied with the outer frame fully assembled, with sashes supplied loose.
Doors with a width of 4000mm or more and/or a height of 2400mm or more will be supplied in kit form, with sashes supplied loose.
Glass units will always by supplied loose.
Installation Instructions
IMPORTANT: Please ensure that the instructions are fully read and understood prior to beginning the installation of the door. If the installation guide is not followed properly, this could result in the unit not operating correctly.
CAUTION: Regulations governing the use of glazed windows, doors, storefronts and/or partitions vary widely. It is the responsibility of the building owner, architect, contractor or installer to ensure that products selected confirm to all applicable codes and regulations. Read our guide on building regulations for doors and windows for more information.
Quickslide Ltd. can assume no obligation or responsibility whatsoever for failure of the building owner, architect, contractor or installer to comply with all applicable laws and ordinances and safety and building codes with the exception of UKCA Marking.
Part 1 – Preparing the Opening
Ensure the aperture is 15mm wider and 15mm higher than the outside frame size of the unit ordered.
Please note that the outside frame height of the required unit is measured from the underside of the sill and NOT FROM THE FINISHED FLOOR LEVEL.
IMPORTANT – Due to the large opening sizes, weight and movement of the panels, any application should take into consideration the following;
- The rough opening should be level, plumb and square at all points. There should be no unevenness or bowing. Make sure that the header is not twisted. There should be no bumps on the floor. The sides should be in the same vertical plane and not offset from each other. A telescopic rule and other similar precise measuring equipment should be used to make these determinations.
- The structural integrity of the header is critical for the proper operation. Deflection of the header should be limited to L/720th under full live and dead loads with a maximum deflection limit of 9mm.
- A qualified engineer or architect should be used to determine the proper construction details and header to be used in your particular application.
TO AVOID FUTURE PROBLEMS, DO NOT INSTALL THE UNIT UNTIL THE ROUGH OPENING HAS BEEN CORRECTLY PREPARED.
Part 2 – Handling of Components
1. Upon receipt of the products, please carry out a thorough inspection to ensure that all items have been delivered in good suitable condition.
2. Store the products in a secure, clean and dry environment and protect against defacement or damage.
3. Mark sure that the parts box supplied is not mislaid.
During the installation all parts need to be plumb, level, square and free from twist.
Plumb – “Plumb” is what you call a perfectly vertical line. Vertical means up and down. Something that is “plumb” runs perpendicular to the horizon — meaning that when it intersects the horizon, it makes a right (90 degree) angle.
Level – “Level” is what you call a perfectly horizontal line. Horizontal means side to side.
Square – “Square” refers to perfect corners. Corners should be at exactly 90 degrees.
Free from twist – “Free from twist” relates to parts being lined up correctly. Your lines should be perfectly vertical (plumb) and horizontal (level), and your corners should be exactly 90 degrees (square).
This means that the frame and/or door panels should not be tilted or sloped in any way. Every element of your orientation must be exact. Nothing should lean in any direction. If just one corner or one line of the installation isn’t straight, the doors will not function properly.
This install guide is based on an installation of a four panel bifold door.
You may need to adjust these steps based on your configuration.
The bottom rail must be kept clean to ensure the doors slide smoothly.
Kit Form Assembly
Remove Packaging
Remove the outer frame from its packaging and lay out the frame on a flat surface working area. The working area should be twice the height and width of the door.
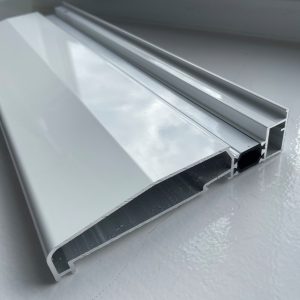
The bottom of the frame will feature a drainage and steel track.
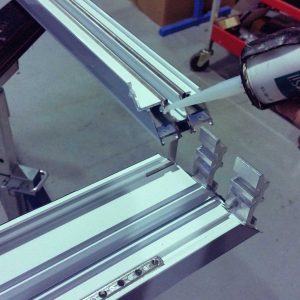
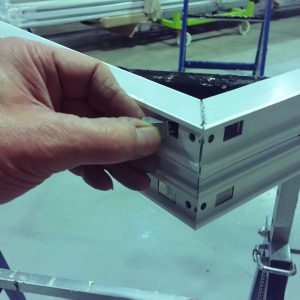
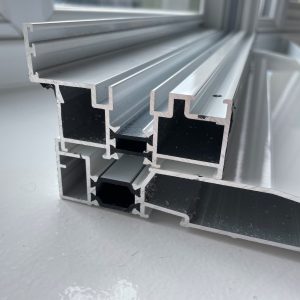
Assemble Outer Frame
2 of the frame pieces will have 2 metal cleats (see Fig 1). Before assembling the pieces together, you will need to use silicone around the edges to weather seal the frame. The pieces should then be inserted into the channels. Once inserted place the silver tension blocks in the pre-punched holes.
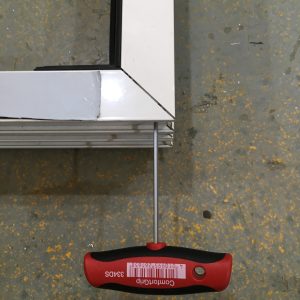
Once the silver tension blocks have been inserted use the 2.5mm Allen key to tighten grub screws making sure surfaces are level.
Gasket
The outer frame will come with a flipper gasket attached. This will need to be pushed into the groves all the way round the frame.
The gasket will be glued to one side of the frame (usually the side majority of the panels stack towards). Once the frame is fully assembled, feed the gasket into the channel all the way around the frame. Please note that on door configurations without a traffic door, no gasket will be supplied, and the doors will come with a wool pile seal instead.

Preparing to Fix the Sill
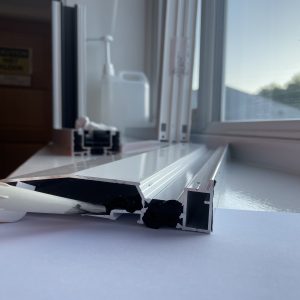
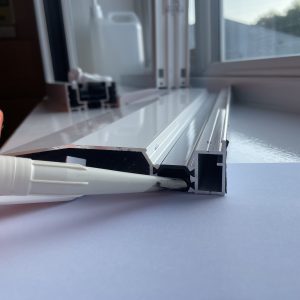
Before fixing the sill to the bottom of the aperture, fill the two outwards facing chambers (as illustrated) with a thick line of silicone along the edge. This is to stop any drainage water from escaping the drainage channels. Use an appropriate colour that matches the frame finish.
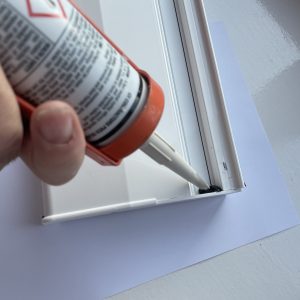

Then attach the sill end caps and add a layer of silicone in the channel top stop any drainage water from escaping down the side of the sill.
The sill end caps must be fitted before the sill is fixed in place.
Fixing the Sill
Fix the sill to the bottom of the aperture through the first inwards facing chamber. No drainage will go through this chamber so you can go all the way through.
Please note: At this point, the sill end caps should be fitted.
Fixing the Frame to the Sill
Place the frame on the sill and fix it in place. The screw should enter the chamber but DO NOT let the screw go through the bottom of the sill.
Drainage
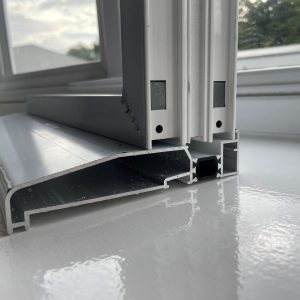
On some door configurations, the drainage will be ‘face drained’ through the bottom of the frame. On most configurations, drainage will go through the sill as illustrated. Hence the importance of not drilling through this chamber as water would not be drained accurately and could enter the property.
Part 3 – Fitting the Outer Frame
Note: This part requires minimum 2 people
- Remove all door panels from outer frame making a note of each one’s location in the frame. 2 people should lift the outer frame into the aperture and on to the sill.
- If there is no sill applicable to your order, then please refer to the instructions below;
- Create a silicone bed on the masonry for the outer frame to sit on.
- Temporarily secure the frame to the rough opening with clamps.
- Make sure that the frame threshold is packed underneath to make it level and plumb (packers not supplied).
- Pre-drill all fixing points first then fix through the thermal break of the outer frame into the masonry using suitable frame fixings (not supplied).
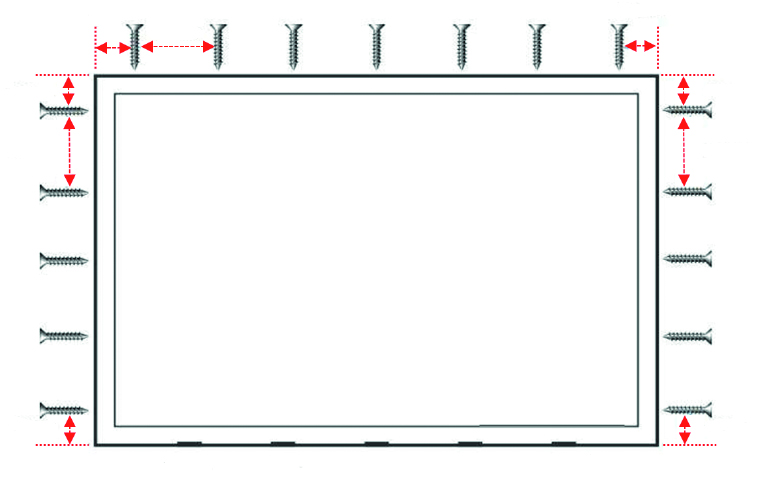
- Fix through the thermal break of the outer frame into the sill at 100mm from each end and 600mm between.
- Before fixing the sides and head, the outer frame should again be packed suitably to ensure it is square and plumb.
- Fixing points should be set 100mm from each corner of the outer frame and then every 600mm between.
- Once the outer frame is fixed in place, it should be level, square and plumb, this should be checked at every 600mm in both width and height using a suitable measuring device.
It is vital to ensure that the outer frame is fitted square, plum and even.
It is vital to ensure that the sill is packed correctly, especially at the side where the door sashes stack.
Hanging the Door Sashes
Your new doors have already been factory assembled and tested prior to being flat packed so the hinges will be pre-fitted in the correct location, the following steps will details how you go about hanging the sashes to the pre-fitted outer frame.
- All loose door panels will carry a numerical label which stipulates the order in which they should be fitted in to the outer frame.
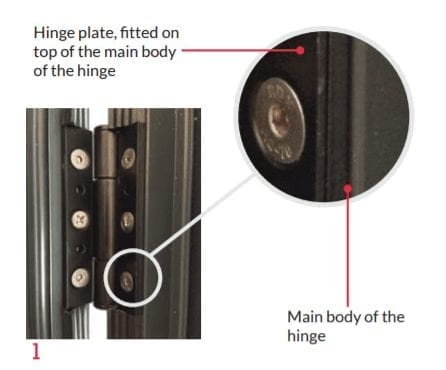
- Start by fitting sash number 1 to the outer frame. The hinges are pre-fitted on the sash and the outer frame already has the hinge backing plates attached.
- Door ‘1’ will have hinges on one side only which will then connect to the outer frame using the ‘first fix’ screws and external hinge plates.
The external hinge plates are first to be located on top of the hinge, as shown. (Fig. 1)
This should be repeated on the remaining hinges on door 1. - As you offer up the 2nd sash slightly tilt it in order to allow the wheels and top glide to slide in to place, then simply repeat the above steps for the third sash, ensuring that after every sash is fitted you check to ensure it has the same gaps top and bottom as the first sash, once you are happy you must use the screw to lock each hinge in place.
- If panels/sashes fold both sides, the final sash is fitted against the outer frame in the same way as sash 1 was, by simply offering up the sash with the hinges on and securing them to the hinge backing plates which are already located on the outer frame.
- You can now close the sashes, from the inside pull the D handle to bring the sashes towards the track, once they are closed turn the pendulum handle to engage the shootbolts. If your door configuration comes with a traffic door, use the main door handle to close and engage the locks.
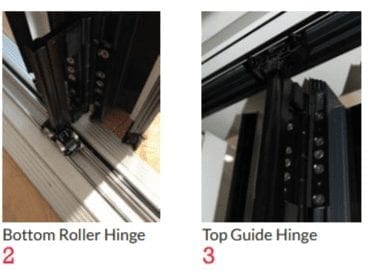
Installing a Door Panel with Wheels and Guides
- The wheels and guides will always be attached to the relevant door panel and are part of the top and bottom hinge assembly.
- These require hinges unlike the standard ones DO NOT require hinge plates to be fitted.
- This door panel should be fitted into the outer frame on an angle so that the guides and wheels attached to the sliding post are able to clear the outer frame and sit in to the rebated channels at the top and bottom of the outer frame.
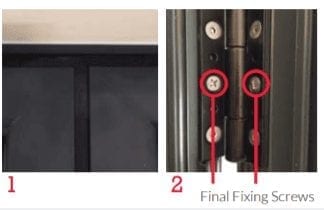
Final Fixing Screws
- Once all of the door panels have been fitted, you should ensure that all of the heads of the door panels ‘line-through’ with each other. (Fig 1)
- Assuming the panels do line-through then you can fit the ‘final fixing screws’ to the centre hole of ALL hinges including rollers and guides. (Fig 2)
The final fixing screws need to go in prior to glazing due to the weight of the glass.
Glazing the Door Sashes
ALL GLAZING SHOULD BE CARRIED OUT BY A COMPETENT GLAZIER. GLAZING PACKERS AS WELL AS A TOE AND HEEL GUIDE HAVE BEEN INCLUDED.
- Remove the pre-glazed beading (4 per sash). Make a note of which bead goes where.
- Follow the toe and heel glazing guide on page 11 for details on packer locations.
- Fit the bottom packers only prior to the glass units being installed.
- Lift the glass units into the door panel (2 people required).
- Fit remaining toe and heel wedge packers.
- Tap in the glazing beads in the relevant locations. Glazing beads come with integrated gaskets.
- Repeat on all remaining door panels.
Toe & Heel Glazing Guide
Bi-fold door sashes are heavy, and although the dead weight is supported on the hinge side there is nothing on the lock side to support the weight. Toe and heeling of each sash is therefore essential to prevent the doors dropping and catching. For sashes under 1000mm in width, standard 2-4mm wedge packers will be supplied.
We recommend following the steps below that explains how to use a Toe and Heeler device to reinforce the door, which essentially enables the glass to support its own weight.
Please note not all doors come with a toe and heeler device and some doors may require conventional toe and heeling using wedge packers.
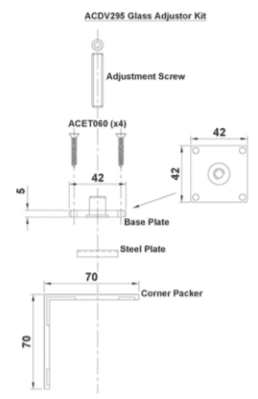
Toe and Heeler Device (ACDV295)
The Toe and Heeler device comes in 4 separate parts as shown below.
- a) Adjustment Screw
- b) Base Plate
- c) Steel Plate
- d) Corner Packer
The Base Plate and Adjustment Screw are pre fitted to the sash in the factory.
The Steel Plate and Corner Packer will come in the stores package and must be used in place of standard packers in the corners where the device is fitted.
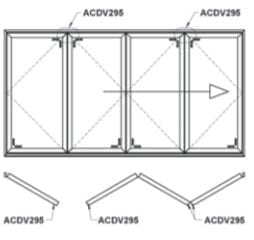
Where to Fit the Device(s)
To stop a door sash dropping it needs to be braced diagonally corner to corner by the Toe and Heeler devices between the glass and the frame. On the hinge side of the sash the devices go at the bottom corner, whilst on the lock side they go at the top (opposite corner).
Below is an example of where to fit the Toe and Heeler devices, you should use the same principle when glazing other configurations.
Fitting with a 28mm Glass Unit
The Toe and Heeler device will require a notch to be cut out when fitting 28mm units to allow the bead to sit in place, as shown below.
Please note: Failure to install all of the parts will invalidate the guarantee and could potentially shatter the glass unit.

Insert the glass unit and fit the serrated glazing wedge packers between the glass and the glazing bridge packers, figure 3. The glazing wedge packers should be tight enough to hold the glass in place without the beads.
Check to ensure that the glass is sitting square in the sash, using more or less serrated wedge packers as required. It is important to ensure that the sash is also still parallel with the outer frame, if the sash is sitting too low increase the number of serrated wedge packers at the top of the door.
Once the unit is in square and the sash is parallel in the outer frame refit the beads in the sash.
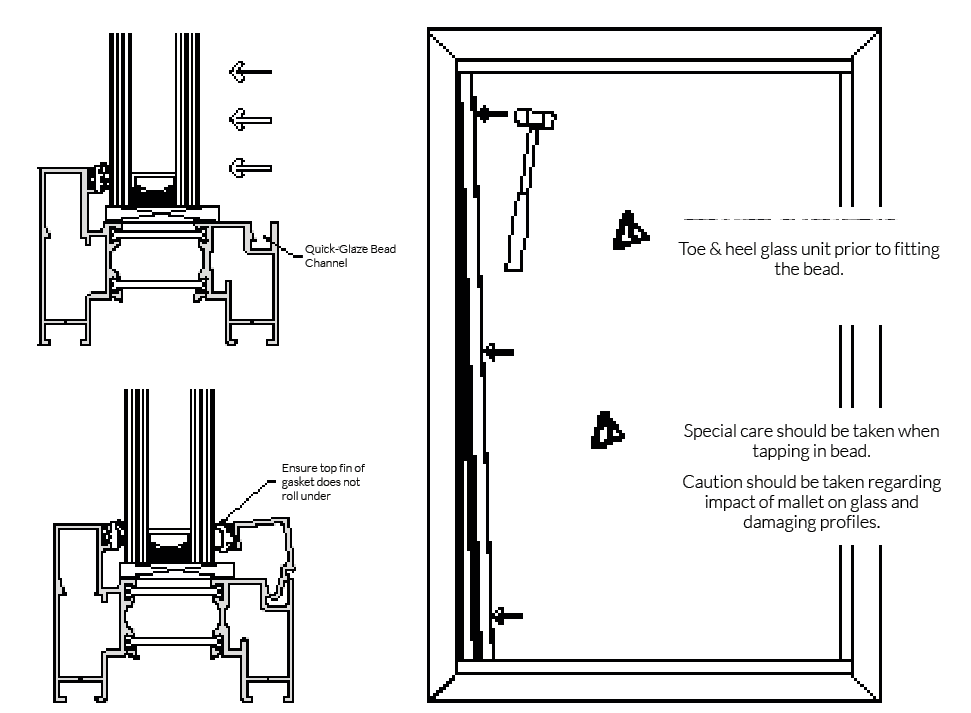
Quick-Glaze Bead Installation
- Push the glass unit forward to engage compression of the gasket.
- Beginning with horizontal beads, locate bead in clip channel of sash as shown. Integrated gasket may rest against glass unit.
- Apply firm pressure to the bead to hold in position. This may cause the bead to fully lock into position.
- Using a nylon mallet, tap bead into channel, working from one end to the other. Please take care at this stage to avoid damage to both the glass unit and the bead.
- Repeat steps 2 – 4 to install vertical beads.
Final Checks & Adjustments
- After installation of the glass units, you should check the operation of the door to ensure that it is smooth with no catching door panels. If you find that a panel is catching you will need to adjust the toe and heel of the relevant glass unit.
- You should have an 11mm gap between the edge of the door panel and the edge of the outer frame (gasket line). This is applicable to all 4 sides of the outer frame. (Fig 4)
- You should ensure that all locking mechanisms operate correctly (traffic doors and intermediate doors).
- There should be no debris or residue in the bottom channel of the outer frame where the roller-bearing wheels are located.

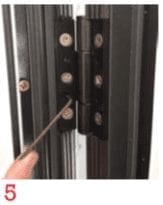
Adjust Hinges
- The hinges can be adjusted up and down using the 2.5mm Allen key provided. This is done via a grub screw located on the internal of the hinge. In order for the adjustment to be effective, the final fixing screws will need to be removed and the first fix screws loosened.
- Toe and heel glass units for adjustment on the intermediate doors.
Fitting Door Magnets
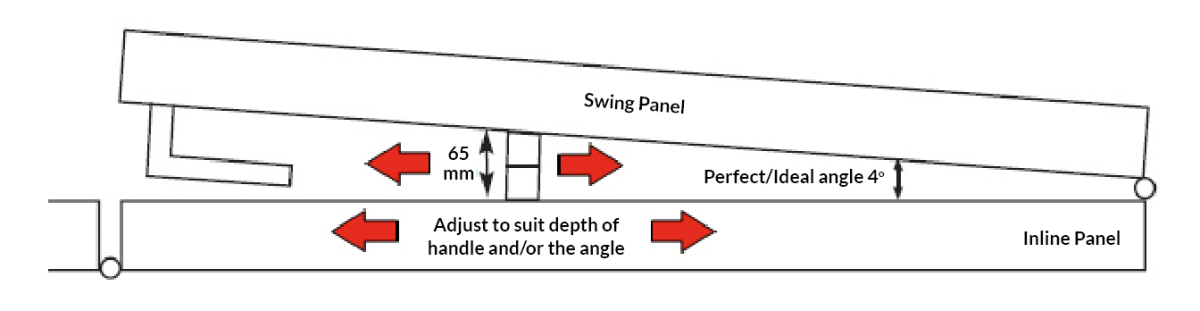
In order to hold the door sashes together when they are all open, magnets can be provided, which you will need to fix to the sashes after installing the doors.
- Position the swing door at the point you wish to stop, allowing for the lever/lever handle plus a bit of tolerance, as per below.
- Offer up the fully assembled magnet and mark the position on only one of the sashes.
- Unscrew one back plate and fix with the choice of fixings in line with the position marked. Ensure that the anti-rotation screw is nearest the main traffic door hinge.

- Screw in and tighten the 3mm grub screw, then screw on the outer sleeve complete with the opposite catch still attached.
- Carefully position the opposite panel up to the catch and mark accordingly.
- Repeat steps 3 and 4 above, before screwing on the outer sleeve.
- Show the end user how to correctly open and close the doors, explaining that the door is not designed for hard impact or fixed retention.
Basic Operation with Traffic Door
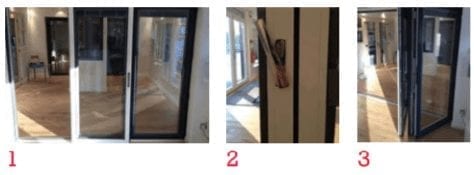
To Open
1. Unlock the traffic door and open it 180 degrees. This door will then close on to the next door via a magnetic panel catch (supplied in the parts box).
2. Unlock the remaining intermediate door panels using the intermediate handle (you do this by turning it nearly 180 degrees from pointing down (locked) to pointing up (unlocked).
3. Fold panels pair-by-pair sliding all of the panels carefully over to the side so they are all stacked together.
To Close
As described previously but in reverse order.
- Slide the pairs of intermediate door panels one-by-one back into the frame so they are shut.
- Lock each of these pairs off as you close them in to the frame.
- The traffic door should remain open and be the last door you close.
- Pull the traffic door closed and lift the handle upwards to engage the locking system in to the frame.so they are all stacked together.
Basic Operation Without Traffic Door
To Open
- Unlock all internal handles.
- Slide the panels pair-by-pair slowly to the side so that they are all stacked together.
To Close
- Pull the handle between the panels closed so that you are working from the final set of opening panels to the first set of opening panels. Once these panels are pulled back tight against the frame, turn the handle to secure.
- Pull the second pair of panels closed and lock into the frame and turn the handle to secure.
Tips
- You must toe and heel the glass into the openers; there will be a diagram in the fixing kit. This is a very important step! The glass panel in a bifold is obviously quite big and with that comes a lot of weight and to make sure the glass doesn’t drop each panel needs to be properly toe and heeled.
- Make sure Allan keys on the hinges on the doors are tight and use fixing screws provided to fix the hinges. You would be surprised how many people forget to fix the final fixing screws. When you think you’re done with the installation, go through each step again.
- Make sure on middle doors the key is taken out before opening and folding the doors to prevent it from snapping in the lock between two panes.
- Cut the gasket at an angle for it to fit nicely into the corners. We’ve introduced a new gasket that doesn’t need to be cut in each corner. The new gasket will only need to be cut once to fit around the glass section. Don’t leave the gasket too tight – it’s better to squeeze in a longer length because when you fit the gasket it’s hard not to stretch it but when it goes back to its normal form you want to make sure there are no gaps.
Watch the Video
If you follow these steps and tips carefully, you should be able to successfully fit your own bifolding doors. If you experience any issues whilst installing your bifolding door; it is best to get a professional installer to do it for you rather than risk damaging your home or the product. If you have any further questions, please get in touch via our contact form. Alternatively, give us a call on 0333 241 2240.

You May Also Be Interested In:
- Bifold Door Maintenance Made Easy – Follow These Simple Steps
- Bifold Doors vs. Slide and Stack Doors: Which Is Right for You?
- Open Up a World of Possibilities with Quick-Glide
- Indi-Fold: Fully Tested, Compliant And Ready To Be Installed!
- Why Choose Aluminium Bifold Doors?

Their knowledge and expertise have been honed by working closely with the rest of Quickslide’s extensive team of professional manufacturers, letting them learn the ins and outs from direct sources. Their B2B experience is further enhanced by Quickslide’s long list of trade partners, offering additional insight into the manufacturing and installation process of sash windows, bifolds, flush windows, patio doors, and more.
- Quickslide Showcases Sash Window Innovation at the Ideal Home Show - 24 April 2026
- We’ll see you at the Glazing Summit! - 2 October 2025
- Guide to Different Types of Windows for Your Home - 11 September 2025
Please note, our news articles are relevant and accurate at the time of release, but as technical developments dictate, and times goes by the information in this article may no longer be applicable. If you have questions, please contact us using our online contact form or call us on 03332 412 240.