

uPVC Casement Windows Installation Guide
Share this story!
Share this post to any popular social media, email it to a friend or print it off.
Index
- Introduction
- How Long Does It Take?
- Tools
- Installation
- New Build Applications
- Refurbishment Applications
- Downloadable PDF Guide

Introduction
This guide will show you step-by-step how to install uPVC Casement Windows. If you have not yet bought your windows you may also first want to review our window and door buying guides, where you will find discussed our range, including sash windows.
The installation of any window is a complex job that most people without some experience of building and joinery may have difficulty in doing and so shouldn’t be taken lightly. Many window suppliers including Quickslide can help with an installation service should you not feeling confident in doing so.
How Long Does it Take?
Generally, it takes between 1-2 hours for a new build and 3-5 hours to remove an existing window and replace with a new one. Because there are so many different configurations and sizes available for casement windows, the time it takes to complete the installation varies a lot from window to window.
Tools and Materials
You will require the following tools and equipment before beginning:
- Tape measure
- Level
- Silicone gun with silicone to match the external frame finish
- Foam gun
- Fixing screws
- Screwdriver (cordless if possible)
- Hammer
- Chisel
- Hand saw or electric saw
- PPE equipment such as safety glasses
Installation
Step 1 – Survey
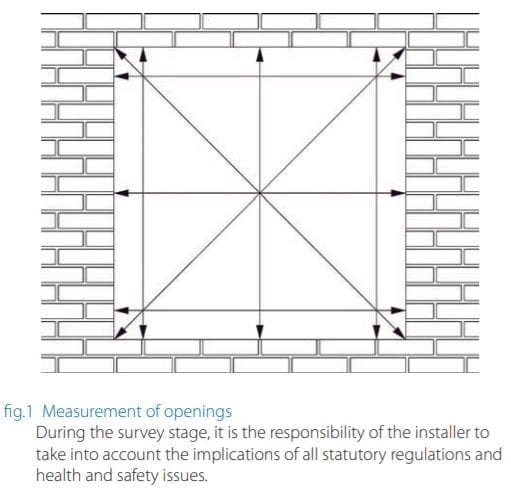
First of all, checks must be performed to ensure there are no structural concerns or defects to the aperture. The openings should be measured in line with the pattern as shown in fig.1.
Following this, the smallest height and width measurements should be taken, and these will become the ‘tight’ sizes to be used.
Checks should be made across the diagonals to confirm the square shape of the opening and then the preferred method of fixing is determined during the survey. The decision should be made in line with the client and any other aspects which may affect installation.
It must be ensured that installation is done in line with Part B of the Building Regulations relating to fire safety.
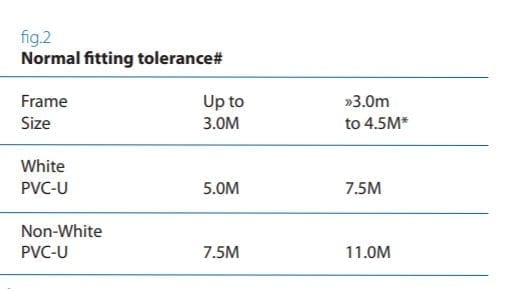
Step 2 – Fitting Tolerances
From the ‘tight’ sizes which were recorded above, now fitting tolerances or clearances should be made. These are essential to permit contraction and expansion of the uPVC frame.
Fig.2 shows the table used to determine the tolerances. It should be noted that wider tolerances may be necessary for larger frames and non-white colours. After tolerances are deducted and you have made allowances for things such as stub-cills, the remaining size is the frame ‘manufacturing’ size.
Step 3 – Frame Positioning
New frames must be correctly positioned in the opening and care should be taken to ensure they are located with horizontal members level and vertical members plumb. Temporary packers or wedges should be used in order to position and secure framing ahead of fixing.
Step 4 – Fixing Methods
There are a number of industry approved methods for fixing; fasteners and lugs are protected against corrosion in accordance with industry standards:
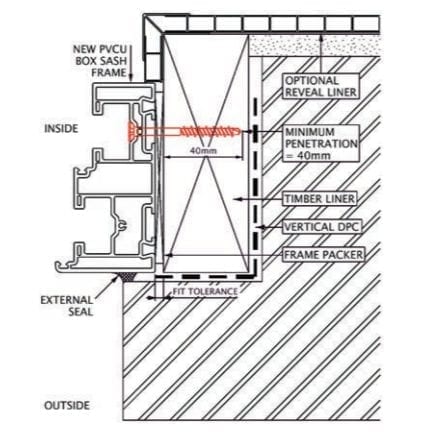
Through Frame Fixing – Into blockwork, brickwork or similar structures with expanding anchors the minimum penetration into the structure is 40mm. At each individual point of attachment, anchors should pass through non-degradable packers in order to retain the fit tolerance and to ensure there is a secure attachment between the frame and structure. You should take care to avoid distortion by overtightening to retain correct function and performance of the finished unit. Self-drilling and tapping screws can be used to attach frames to thin-gauge steelwork where appropriate. Per jamb, a minimum of two mechanical fixings is required.
With Fixing Lugs – this an alternative means of mechanical fixing to the above. It is most commonly used on new builds to enable factory glazed frames to be used. The same requirements for anchor penetration are used as above.
With Polyurethane Foam – This method is typically used at the head where mechanical fixing is inappropriate. In this instance the foam suppliers’ guidelines should be followed for use. Foam should only be used where a minimum of two mechanical fixings per jam are provided.
Other Fixing Methods – there are other methods which can be used but these should only be considered after being assessed for suitability and with professional advice.
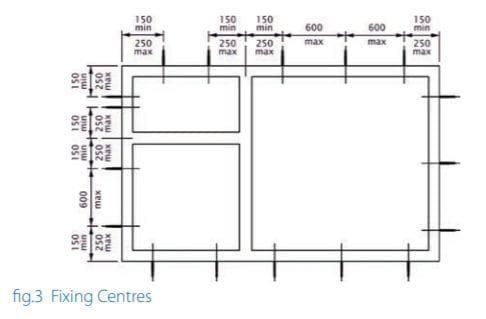
Step 5 – Fixing Locations
In accordance with the details shown in fig.3, mechanical fixings should be positioned.
Fixings must not be less than 150mm and not greater than 250mm at corner joints. They also must not be closer than 150mm to transom or mullion centre lines. Intermediate fixings are at maximum of 600mm centres and a minimum of two mechanical fixings per jamb should be provided.
Frames which are over 1800mm wide should receive a minimum central fixing point at both head and cill. In addition to this, coupled frames should be carefully aligned during the fixing process and secured close to the coupling bar ends. Fixings through the cill areas should be sealed over to avoid water damage and polyurethane foam can be used with agreement from the client where the presence of steel or concrete makes secure mechanical fixing difficult but foam fixing should not be used as the sole means of fixing.
Step 6 – Glazing
Glazing applications must comply with BS 6262 and BS 8000-Part 7; in addition, they must also satisfy the requirements of Approved Document L of the Building Regulations for the conservation of energy and Document N on Safety Glazing. All glass units and/or panels must be installed in accordance with both the manufacturer and supplies recommendations with care being taken to correctly position glazing packers.
Step 7 – Finishing and Cleaning
At the end of the installation the finishing lines and paint marks, such as those from old frames should all be removed as much as is practical. In addition to this, all protective tape should be removed, and any finishing trims applied. Following this, the frames should be cleaned, and paths cleared of debris.
Step 8 – Sealing of Frames
Sealing the frames against water is essential; the fitting tolerance between the frame and the structure should be sealed against the ingress of water and air leakage. Low modulus silicone sealants are common with the application of uPVC framing. When being fitted on a new build, internal sealant should also be used. Frame to structure gaps in excess of 6mm should have a firm closed cell backing which helps avoid the use of excessive sealant being used.
Step 8b – Bay Windows
When fitting in bay windows special consideration should be taken. It is first essential to consider whether the bay is load bearing or not; this would be determined during the survey. Corner post arrangements are available to suit both situations and the correct product should be used. Suitable propping should be employed and if there are any doubts suitable professional advice should be sought.
Step 9 – Final Inspection
After practical completion, the installation will need to be inspected for function, glazing correctness, seal quality and visual appearance. Final inspections should be completed with the client or their agent.
New Build Applications
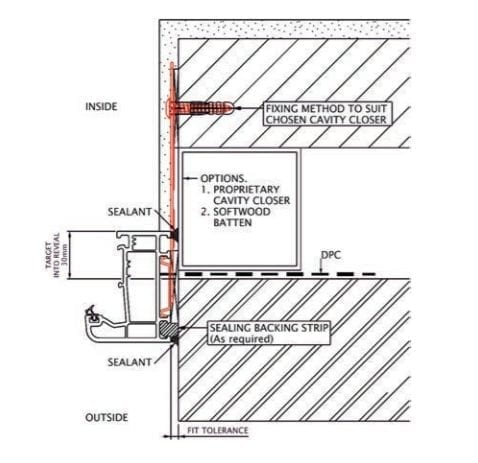
1. Typical Flush Jamb Condition
In order to be compliant with the requirements of ‘robust detailing’ as detailed in the Building Regulations, fixing for new builds will incorporate the following detail:
Fixing should be achieved with a proprietary cavity closer in accordance with the most recent building regulations and using treated softwood battens. Framing should set back to a minimum of 30mm into the cavity for sheltered or exposed zones and fully into check for very severe zones. Seals should be applied internally and externally, and minimum anchor penetrations should be in line with industry guidelines.
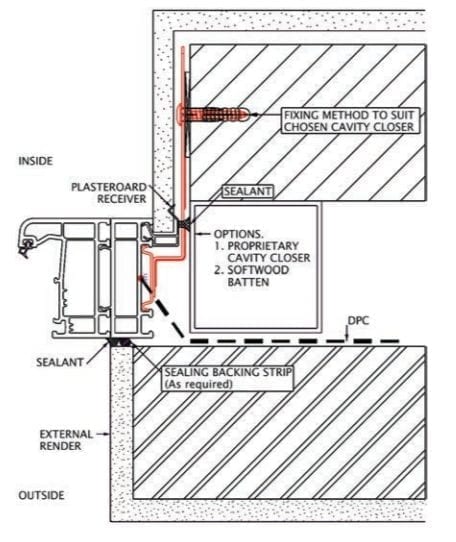
2. Typical Stepped Reveal Condition
Framing should be set back fully into the reveal for very severe exposure zones, as detailed in the ‘robust detailing’ requirements mentioned previously. Dual deals should be positioned both inside and outside and detail below shows the use of cranked fixing lug and frame packer. In addition, where external rendering or other cladding is used, wider uPVC profiles, or ‘add-ons’ may be needed in order to enable outward opening sashes, for example.
Refurbishment Applications
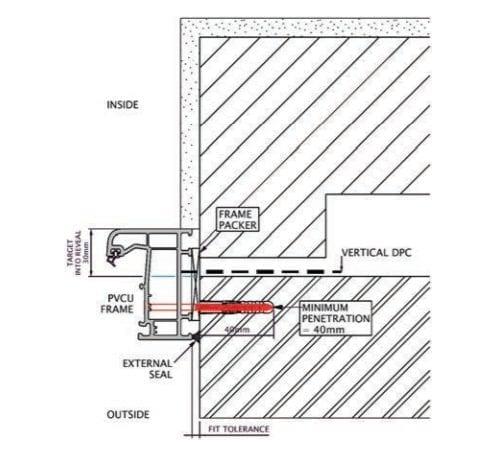
1. Typical Flush Jamb Condition
In general, new uPVC frames are fitted back to the old internal plaster line as this minimises the need for redecoration. Matching internal trims can be used in order to finish internally. Care must be taken to ensure vertical DPC’s are correctly repositioned and renewed wherever necessary. Normally, fixing would be achieve with through frame anchors which penetrate the structure by a minimum of 40mm. Fixing is through non-degradable frame packers to ensure the fit tolerance in maintained and the fixing is secure. In addition, an external seal should be applied using an approved sealant.
2. Sash Box Replacement
Where there are old sash box frames to be removed and new frames fitted, you should pack out the internal reveal with a timber liner. New uPVC frames can match the old or alternative styles can be selected, as necessary. Fixing is achieved through the frame with non-degradable packers to retain the fit tolerance. Anchors must penetration the structure by a minimum of 40mm and an external seal should be applied using an approved sealant.
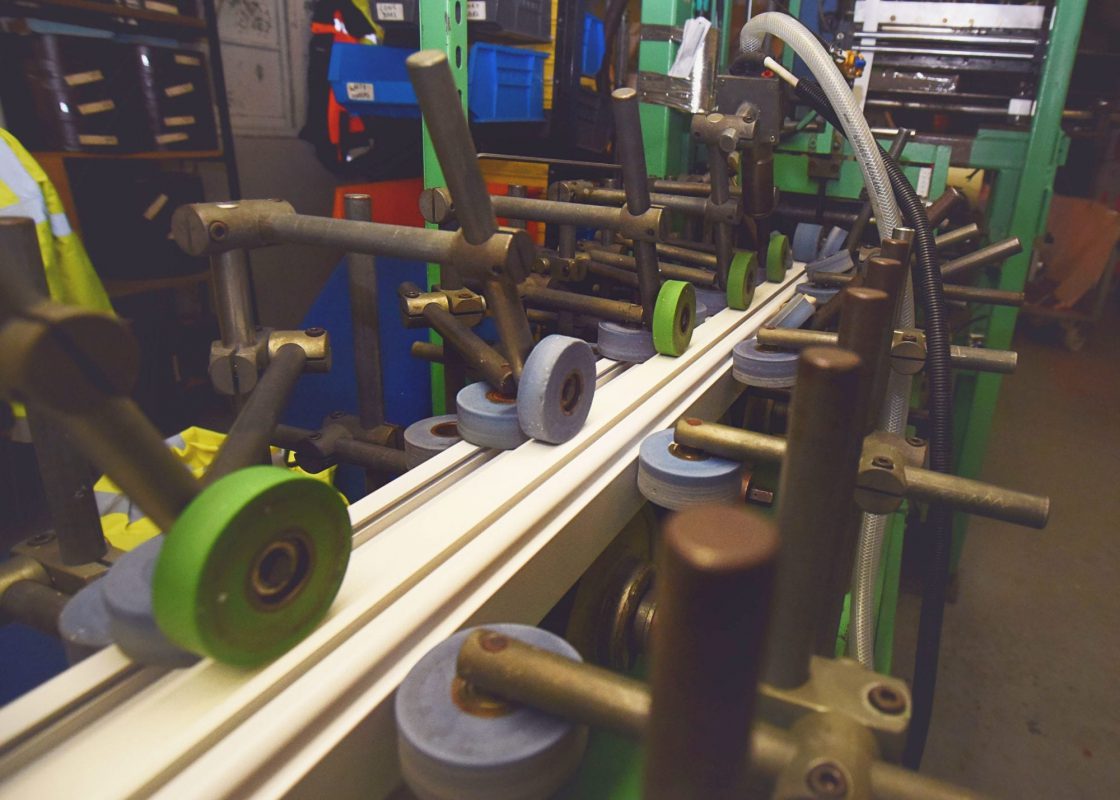
The woodgrain lamination process
The woodgrain foil is bonded to the PVC profile using hot glue and rollers. The profile is then set aside to allow the woodgrain foil to set before the profile is used in fabrication. The foiling process is carried out using state-of-the-art machinery at our production facility in Brighouse. Here at Quickslide we carry out most of our processes including woodgrain lamination, profile bending and colour-bonding ourselves to ensure that we’re in control of both quality and lead time.
Popular UPVC wood effects
The most popular wood effect on our classic UPVC casement windows is rosewood also known as cherrywood. Rosewood windows are characterised by a dark brown-red wood looking finish. Rosewood is one of the longest standing woodgrain finishes within the double-glazing industry and is often the go-to choice on traditional looking homes.
In recent years, homeowners have become more adventurous when it comes to replacement windows; woodgrain finishes such as chartwell green, agate grey and even darker tones such as grey and black are becoming more and more popular. As the choice of colours is now virtually endless we expect to see a broader range of colourful woodgrain windows across the UK in the next few years.
Our wood effect uPVC windows are particularly effective when matching the period looks of certain properties or other styles. Some examples can be found below:
The same effect can also be replicated to match our range of external French doors.


Order a wood effect upvc window

You May Also Be Interested In:
- What Is the Difference Between Sliding Sash Windows and Casement Windows?
- uPVC Casement Windows Installation Guide
- Comparing uPVC Sash Windows vs Wooden Double Glazed Sash Windows
- Ultimate Guide to Sliding Sash Windows
- uPVC Flush Casement Window Installation Guide

Sandra’s comprehensive understanding of sash windows, flush windows, bifold doors and more encompasses everything from initial manufacturing to after-sales support. As a trusted member of the Quickslide team, her authority helps trade partners, homeowners, and industry peers alike.
As one of Quickslide’s most prolific writers, Sandra contributes regularly to the industry with useful insights into the newest innovations in modern sash windows. Her passion for the product shines through in her articles, and her pieces are suitable for technical professionals and homeowners thanks to her digestible, simple breakdowns of complex manufacturing terms.
Each of Sandra’s articles is written using the latest research and industry developments, ensuring that readers receive reliable, up-to-date information as and when they’re published. As a marketing visionary, our clients and their customers can rely on Sandra’s insight for the latest in vertical sliders and other double glazed Quickslide products.
Please note, our news articles are relevant and accurate at the time of release, but as technical developments dictate, and times goes by the information in this article may no longer be applicable. If you have questions, please contact us using our online contact form or call us on 03332 412 240.