


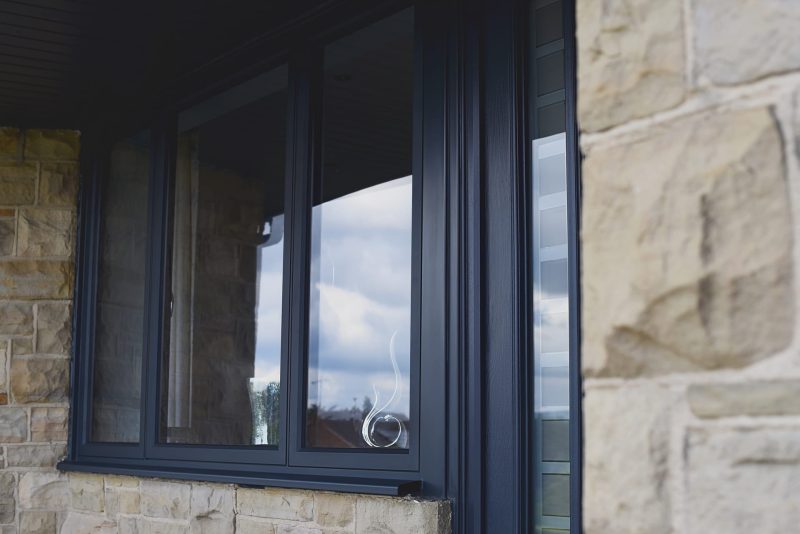
Aluminium Windows Installation Guide

Share this story!
Share this post to any popular social media, email it to a friend or print it off.
Index
- Site Survey
- Removing Existing Windows
- Installation – Aluminium Windows and Doors
- Installation – Fixing
- Installation – Glazing
- Installation – Sealing
- Installation – Commissioning
- Cleaning and Maintenance
- Repair
- Downloadable PDF Guide
Quickslide have a range of products available to pair perfectly with aluminium windows including patio doors and bifold doors. We also stock a range of other windows including styles such as sash and casement, and other materials such as uPVC. Get a quote today.


Site Surveying
To ensure a good quality installation of your aluminium windows, good surveying is essential. The surveyor must be fully trained in window and doorset installation methods and in the manufacturers recommendations for the specific system which is being used. The following must take place within the site survey.
Establish Customer Requirements
Firstly, the surveyor needs to confirm with the customer whether the window is to be inward or outward opening and assess any special specification requirements. The surveyor should then advise of hardware options and establish the purchaser’s requirements. It is essential to comply with building regulations so it advisable to record the style of the window or doorset being replaced along with the size of any opening lights. These can be recorded through images and witnessed by the customer. It is the responsibility of the surveyor to inform the customer of enhancements which can be made in terms of security. Such as a restriction device on outward opening doors. It is also important to consider whether outward opening windows affect pedestrians.
Assess the Aperture for Suitability
Defects around the structural opening must be checked for by the surveyor and if any are found then the purchaser must be notified, and a subsequent agreement made about who is responsible for rectifying the defects prior to installation.
- Additional Services: electrical or specialist items such as aerials and telephone wires which are present in the aperture should also be noted. If possible, these should be routed around and not through the outer frame of the window or doorset. If not possible, the customer and installer should agree a suitable solution which does not compromise the performance of the product. Also, curtain tracks in the aperture should be noted especially for inward opening windows and net curtains. It can interfere with function and cause problems during installation. Actions to avoid problems must be discussed and agreed with the customer before installation can begin.
- Brickwork Removal: the method of any cavity closing should be outlined where bricks are to be removed in order to install products. The method should be agreed with the customer prior to installation. It is advisable to consult local authority building control to ensure local interpretations are taken into account.
Measuring the Aperture
For the width and height, three measurements should be taken and to determine the ‘squareness’ of the aperture, diagonal measurements should be taken. The smallest measurement for both width and height determines manufacturing size.
- Sub Sill Required: Whether a sub sill is needed should be determined. The size of said sub sill should be so there is an overhang of at least 25mm from the face of the building. Taking into account features such as horns and how any making good is to be carried out, the surveyor should determine how the sub sill is to be fitted.

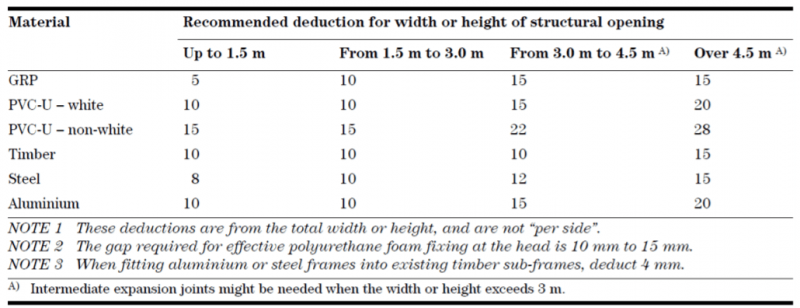
- Checked Reveals: There may be a difference between internal and external reveal sizes, this needs to be determined before checks are made to ensure the operation of any opening light will not be affected by plaster, tiles or render. With any window or doorset with a check reveal it is advisable to remove an internal architrave from it in order to see exactly how deep the reverse brick detail is and in order to identify how much of the outer frame can be placed behind in the width. In order to figure out the maximum height the window or doorset can be placed behind the brick a hole should be drilled through the head of the existing box frame. In many cases this can differ greatly from the width. The door/window height should be calculated once the amount of rebate is determined. The surveyor must take into account the deductions from Table 1. If the rebate is sufficient, they should allow for a 12mm minimum overlap per side. In order to allow opening out lights to adequately clear the masonry a deeper outer frame could be needed.
Calculating the Manufacturing Sizes
In some instances, due to temperature fluctuations, some framing materials will experience significant expansion and contraction and this needs to be taken into consideration. In addition to this, allowances should be made relating to the window or doorset and building aperture tolerances. When calculating height deductions make sure to allow for the thickness of any silicone or mortar bed at the sub-sill.
Surveying for a New Build
When it comes to surveying for a new build, the manufacturing sizes and details of installation would be decided by the house designer in conjunction with the supplier in accordance with current Building Regulations. The surveyor should ensure that the details agreed are suitable and clearly defined in terms of the products being used.
NOTE: If there is any doubt when surveying for a new build, advice should be sought from the system supplier or manufacturer. It should be brought to the housebuilder’s attention that factory finished windows and doorsets should be programmed for installation as late as possible in the housebuilding process in order to minimize any risk of damage.
Performance and Special Requirements
The surveyor should always consider performance and special requirements, such as:
Weathertightness: the surveyor is supposed to determine the design wind load for the application as well as determine whether the windows and doorsets are suitable for that exposure. BS 6375-1 gives guidance on this and where there is doubt the manufacturer should be contacted.
Drainage: It is the responsibility of the surveyor to specify drainage methods of frame and/or glazing to be used.
Thresholds: It is important to consider the type of threshold and any protection which may be required.
Hardware: Requirements for hardware should be specified.
Georgian Bars: The surveyor should either specify or confirm the position and style of any glass pattern or decoration such as Georgian bars.
Planning Permission: The need for any planning permission must be identified, such as for listed buildings or conservation areas.
Risk Assessment: A risk assessment is the responsibility of the window designer and should be carried out by a competent person such as the surveyor. Suitable written records should then be retained.
Cleaning Requirements: Information on the safety of windows in use and during cleaning is given in BS 8213-1.
Structural Loading Requirements
If a load-bearing situation is suspected or even confirmed, then it is essential that the system supplier’s recommendations are followed:
Bow Windows: Special structural calculations may be necessary where bow, oriel or dormer windows have applied loads. If there are any doubts, it should be assumed the structure is load bearing and reference made to the suppliers’ instructions.
Coupled Windows: The surveyor should determine the method which will be used where windows or doorsets are to be coupled. They should take into account things such as wind and dead loads, visual appearance and position of the coupling.
Window/Door Lintel: Reasonable steps should be taken by the surveyor to check that there is a lintel, or another means of supporting the structure above the window or doorset. If there is no such support and the load is carried on the existing window or doorset, alternative support should be provided.
Installation Techniques
The survey should, where possible, identify any necessary variations to the standard techniques of installation such as direct fixing or lug fixing.
Removing Existing Windows
All relevant documentation should be available and understood; this is the responsibility of the installation team, alongside ensuring all relevant products and equipment are available. Before the work can begin, it is essential that the sizes, types and condition of all windows be check against both the survey sizes and types and against the actual aperture sizes.
Limiting Damage
It is the responsibility of the installer, both internally and externally, to protect the property during installation work. Care should be taken when removing existing windows/doorsets to avoid any unnecessary damage to the building structure and finishing’s. Care must be taken to avoid any debris becoming embedded in soft garden areas such as lawns and to avoid soiling or damaging floor coverings and decorations. There is likely to be inevitable damage to the reveals adjacent to the installation and care must be taken to keep this to a minimum. Prior to commencing work the installer can request that the purchaser remove any fixture, fixings or fittings which might be damaged during installation.
Weathertightness
To maintain the security and weathertightness of the structure, the installer should aim to remove existing windows on the same day as fitting and sealing new windows. When this is not practical, such as with large contracts, an alternative solution for ensuring security and weathertightness should be agreed in advance.
Special Requirements
Any specialist or electrical items such as TV aerials should be routed around and not through the frame of the window. If this is not possible, the routing should be carried out in accordance with the alternative solution which must be agreed between the purchaser and the surveyor. It might require the services of an appropriate service provider.
Safety of Work
Window removal and installation can be dangerous therefore safety precautions should be observed at all times. Any new operatives must be trained in the safe use of all tools and installation companies must ensure their operatives have the correct equipment and PPE. Full training and assessment records of all operatives should be kept safe. Safety precautions include:
- All operatives should wear eye protection as well as safety footwear and appropriate hand and wrist protection when handling glass.
- Any electrically powered tools being used should either work on 110v mains power, be battery operated or work on 240v with a residual current detector of 30 mA maximum rating. This is especially important where moisture is present.
- A safe working platform is required to give safe access to structural openings.
- The following safety precautions should be observed when operating a grinding disc:
- Heavy gloves, face visors and helmets worn.
- Clear access provided.
- Care taken that sparks cannot ignite material such as dustsheets, which are combustible.
- Old windows and other debris should be stored and disposed of safely.
Installation – Aluminium Windows and Doors
All four sides of the frame should be secured as follows, wherever practical.
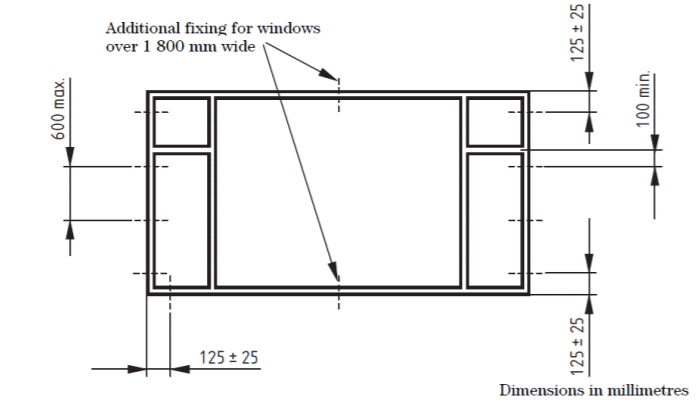
- Corner jab fixings should be between 100mm and 150mm from the external corner.
- From the centre line of a mullion or transom, no fixing should be less than 100mm away.
- Intermediate fixings should be at centres no greater than 600mm.
- Each jamb should have a minimum of 2 fixings.
- For windows over 1,800 mm wide, central head and sub-sill fixings should be provided.
Coupled Assemblies
Coupled assemblies should be delivered to site as separate units to minimize damage and ease handling. Care should be taken to keep coupling joints equal when building up components into the required assembly as well as ensuring the frames are both aligned and plumb. Where you have coupling joints which are also to be used as expansion joints, they should have seals such as bedding mastic or flexible polymer gaskets placed within the joint during the assembly. Relying solely on external pointing sealant is not sufficient. Coupled assemblies should be fastened together according to instructions provided by the manufacturer. If the coupling is structural the system suppliers recommendations should be followed.
Installation
Windows should be installed so that they are plumb and square within the aperture, without twist, racking or distortion. This is so that they operate correctly after installation and in accordance with the surveyor’s instructions.
Frame Placement
The placement of windows should generally be done to ensure there is minimal making good to do; taking into account the following:
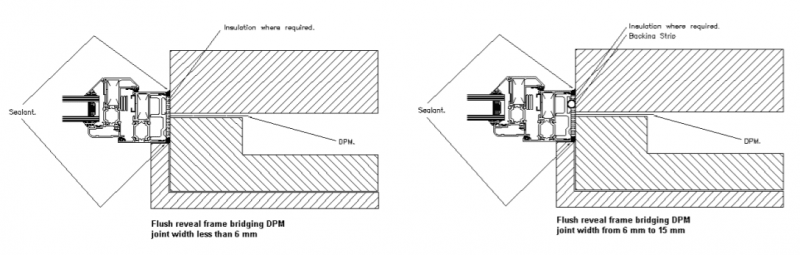
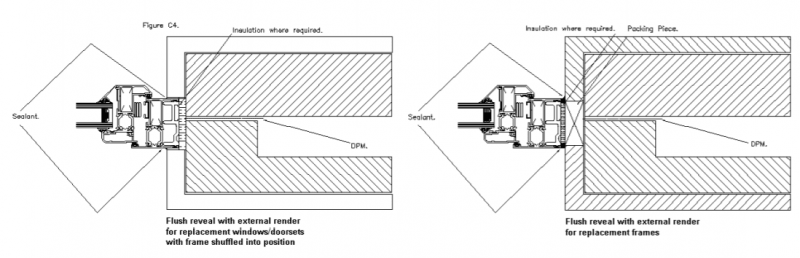
- The new frame should bridge the DPM and any damage to this should be repaired.
- The frame should be set as far back in the reveal as is feasible; this is for better weather performance.
- A correct movement gap should be provided.
In the case of a new build, the position is normally agreed at the time of design and installation should be done in accordance with this.
Open Cavities
Open cavities discovered between inner and outer skins of block or brickwork must be closed or bridged with insulation. The integrity of the DPM should be maintained as much as possible. Adequate purchase for fixing screws should be ensured and if need be with extended fixing lugs.
Installation Packers
Adjacent to fixing positions to prevent outer frame distortion, installation packers should be used. They should be resistant to compression, corrosion and rot. They should span the full depth of the outer frame. They should be tightened to ensure that the frame is secure against the packers. They should not be over tightened as this can lead to distortion. Some lugs need to be packed off the substrate in order to avoid distortion. Additional packers may be necessary, where enhanced security is required, to hinge and locking points.
Finishing
In terms of finishing, contaminants and debris should be removed as well as any drainage paths cleared. Internal reveals should be made good as agreed prior to installation. Protective tapes should be removed and any materials such as trims or sealants should not be applied on top of loose material. Sand and cement should not be used to fill gaps except in the case of backfill for steel windows. If the replacement product has a smaller front to back dimension that what was originally there; there could be a mastic or paint line which should be removed as much as practical or covered. Any method of repair to any render should be as agreed with purchaser.
Installation – Fixing
In terms of fixing, there are two principal methods available. These two methods can be used both separately and in conjunction: through frame fixing and lug fixing. It is the surveyor’s responsibility to specify the nature, location and quantity of the fixings by taking into account the manufacturers instructions.
Imposed Loads
Each frame member must be fixed to the substrate or an adjacent window to resist any imposed loads that could cause the frame to deflect. Imposed loads include:
- Wind loads
- Operating loads
- Gravity
- Accidental impact
- Attempted burglary
Fixing Considerations
Fixing methods can be affected by:
- Absence or presence of a wall cavity
- Condition and nature of any cavity
- The position of the frame and cavity
- The position of the plaster line and a need to ensure minimal disturbance and damage to interior decorations
- The design of the reveal
- Any requirements in terms of fire resistance
Placement
The sides of the frame should always be secured in line with the recommendations, wherever practical. If this is not possible, then, on large contracts, alternatives should be agreed with the purchaser and on smaller, domestic applications the closest possible fixing positions should be used.
Form Fixing
Pre-cast concrete or steel lintels can make it difficult an impractical to achieve the recommended fixing distances. In these cases, the use of polyurethane foam can be useful but foam fixings under no circumstances should be used as the sole fixing method for the entire frame.
Lug Fixing/Direct Fixing
A twist in lug anchor can provide installed into the outer frame then the lug connected to the sub structure. Screws should be sized so that they penetrate at least 25mm into timber, plugged holes in brick, block or masonry, unless provision can be made by other means such as in accordance with an appropriate structural code. Any connections to steelwork which are up to 2mm in thickness such as folded lintels should be made with appropriate thread cutting screws. Connections to those over 2mm in thickness should be either into pre-tapped holes with machine screws of a minimum 5mm diameter or with power-hardened self-drilling screws. Fixing should all be at least as corrosion resistant as BS EN 1670:1998, Grade.
Installation – Glazing
Windows can either be delivered ready glazed or suppled with glass units and pre-formed glazing gaskets to be applied on site. Some systems require glazing tapes. In all cases, manufacturer instructions should be followed, and all glazing should conform to the recommendations given in the relevant section of BS 6262.
Inspection
Prior to installation, all glass units should be examined for damage, and not used if damage is found.
Installation
All aspects of glass installation should be completed in line with BS 800-7. This includes Insulating glass units, setting and location blocks, distance pieces, frame to glass and bead to glass gaskets, bead to frame air seals, corner sealing blocks, beads and bead end caps, bedding and capping sealants.
Setting Blocks
Figure 2 shows the setting and location block positions as recommended by BS 6262.

Insulation/Safety Glass
When installing insulating safety glass, it must be positioned so the safety glass is on the appropriate side. The making on the safety glass must be visible after installation, this is a legal requirement. Units with low emissivity coatings should be positioned according to the manufacturer’s instructions. Failure to do so can render the coating less effective.
Installation – Sealing
Sealants are used to repel water and prevent air leakage. Suitable sealants retain flexibility and adhesion over this period. The movement class for the sealant will depend on the substrate material as well as the frame material and the dimensions of the joint between the frame and the opening.
Sealant Type
Sealants must be tested in line with BS EN ISO 11600. They should of low modulus and high elasticity unless an unusual and specific reason requires otherwise. It should have a movement capability of 20%, at least.
Considerations
Perimeter joints are to be sealed with a sealant appropriate to:
- The substrate material
- Joint size and configuration
- Joint movement
- Frame surface
- Anticipated exposure to weather
Sealants should be compatible with frame material and substrate. Old oil-based mastics and DPM’s can adversely impact the appearance or behaviour of sealants. Consequent photo-oxidation of the migrant products can affect sealant performance and produce discoloration. To avoid this, unwanted mastic should be removed, and sealant should be kept away from DPM’s. In circumstances where sealants rely upon atmospheric moisture to initiate curing, deep filling should be avoided.
Sealant Backing
To ensure that the sealant is forced against the sides of the joint during application it should be applied against a firm backing. In order to avoid a failure in service, it should not adhere to the backing as this would restrict movement against the joint. These recommendations can be achieved through the use of a closed-cell, oversize circular foam strip. For aluminium windows, best practice is to have an insulating fill inserted or inject wherever practical around the perimeter and behind the external seal.
Trims and Pressings
All trims should be compatible with the material of the frame. They should also be colour matched where specified. Where used externally, finished trims should be good quality. Cellular extruded PVC-UE trims should conform to BS 7619.
Installation – Commissioning
Final Inspection
A final inspection should be carried out after installation; preferably with the purchased to ensure it is in line fully with the surveyors and manufacturers instructions.
Correct Operation
Post installation, the purchaser should be made aware of the methods of operation such as locking, unlocking and fire egress. This should be accompanied by written operating and maintenance instructions such as those published by trade federations. Ideally all occupants of the household should carry out the operation. If difficulties are found, alternatives should be agreed. In new builds or full refurbishments where the occupants are not present it is the purchaser’s responsibility to pass on instruction. Information should also be provided on ordering spare keys.
Cleaning and Maintenance
When windows are in areas within direct influence zones of chemical plants, salt water or other aggressive emission sources, the windows should be cleaned at least every three months but in cleaner environments it should be at least every 6 months. Internally, frames should be thoroughly cleaned at least once a year.
Procedure
- Wash with clean warm water and a non-alkaline detergent. Use a non-abrasive sponge or soft bristle brush.
- Rinse with clean water, thoroughly.
- Dry using a leather or soft cloth.
- For extra protection a wax polish can be applied once or twice a year again polishing with a soft cloth to restore glass.
Repair
Where mechanical damage or scratches have penetrated the paint through to the aluminium blisters and corrosion can occur.
Procedure
- Using a fine grade (120-360 grit) abrasive paper, remove corrosion and non-adherent paint.
- Wipe using white spirit.
- Ensure the surface is fully dry and then apply a thin primer coat. Let dry for 20 minutes.
- Using a fine brush, touch in the damaged and primed area with an air-drying paint.
Replacement of Broken Glass
Windows can be re-glazed using materials supplied, but any damage to the gasket or beads may mean replacement is necessary to ensure weather performance.
Replacement of Damaged Components
Furniture and fittings can be readily replaced by releasing fixing screws and then changing the fitting. Refer to your supplier.
Window Hardware Maintenance
Locking mechanisms should be lubricated regularly to minimise wear and maintain smooth operation. Lubricant should not, however, be applied to friction pads as this impairs their breaking ability.
Further Questions
How Much Do Aluminium Windows Cost?
How much aluminium windows cost can be a difficult question to answer due to the number of things that can raise or lower the overall cost. The number of aluminium windows, size, colour, glazing type, and more can all go into the final cost.
You can request a price for our aluminium windows now on our website to get an accurate cost for your next project.
How Long Do Aluminium Windows Last?
Aluminium windows can last for decades with only minimal maintenance requirements. Aluminium is a lightweight yet robust material that is capable of withstanding harsh weather without warping or losing its shape.
While how long aluminium windows last can differ slightly depending on the location and style, on average, they can last 3 decades.
Why Choose Aluminium Windows?
There are plenty of reasons to choose aluminium windows, such as long lasting durability, low maintenance requirements, sturdy modern security, and slim sightlines that flood homes with natural light.
At Quickslide, we can offer a range of aluminium windows and doors to suit a wide variety of homes.
You May Also Be Interested In:
- Why Choose Aluminium Bifold Doors?
- What Are 7 Benefits Of Aluminium Bifold Doors?
- uPVC Sliding Patio Door Installation Guide
- When To Replace Patio Doors?
- Which is Better Bifold or Sliding Doors?

Sandra’s comprehensive understanding of sash windows, flush windows, bifold doors and more encompasses everything from initial manufacturing to after-sales support. As a trusted member of the Quickslide team, her authority helps trade partners, homeowners, and industry peers alike.
As one of Quickslide’s most prolific writers, Sandra contributes regularly to the industry with useful insights into the newest innovations in modern sash windows. Her passion for the product shines through in her articles, and her pieces are suitable for technical professionals and homeowners thanks to her digestible, simple breakdowns of complex manufacturing terms.
Each of Sandra’s articles is written using the latest research and industry developments, ensuring that readers receive reliable, up-to-date information as and when they’re published. As a marketing visionary, our clients and their customers can rely on Sandra’s insight for the latest in vertical sliders and other double glazed Quickslide products.
Please note, our news articles are relevant and accurate at the time of release, but as technical developments dictate, and times goes by the information in this article may no longer be applicable. If you have questions, please contact us using our online contact form or call us on 03332 412 240.